
Note: Everything said in this paper about the Jabra PanaCast 50 also applies to the Lenovo ThinkSmart Bar 180, as they are essentially the same device with different branding.
Introduction
Microsoft announced Intelligent Speaker at Ignite in March of 2021[3] and it went into preview in the second half of that year. At initial release, EPOS and Yealink[4] were the only two manufacturers to produce certified Intelligent Speaker devices.
In the blog announcement from Microsoft, Intelligent Speaker was defined as something that will “…allow attendees to use the transcription to follow along or capture actions, by knowing who in the room said what. Whether you are working remotely or following the meeting in the conference room, you can effectively see who said what during the meeting.” [5]
Cool. What does any of that mean?
Why does this thing exist?
How do you set it up?
Any security issues with this?
Wait – I thought this was about identifying the person talking, so shouldn’t it be called “Intelligent Microphone”?
These questions, and many more, will be answered in the following beautifully worded document.
What is Intelligent Speaker?
Intelligent Speaker (now often called speaker recognition) is proprietary Microsoft technology to uniquely identify a person's voice to have accurate speaker attribution in places such as meeting rooms. Put another way, when multiple people are speaking in a conference room, and the transcription feature in Microsoft Teams is enabled, how can the sentences and words of each in-room attendee be attributed to them as opposed to being generically attributed to the meeting space?
Here is a sample transcript of a conversation in a conference room, appropriately named “Epic Conference Room of Awesome”. Note the sentences from this snippet of the transcript are not attributed to a human, but rather to the conference room.

Figure Donuts are delicious
First off, how many people are in this conversation? One person talking to themselves? Two people? Three?
Let's say there are two people in this conversation. Who said what? Am I bringing the donuts[6] or is the other person bringing them? Who even is the other person?
Wouldn’t it be swell if the transcript showed the name of the person who said each sentence instead of just the room name?
What makes a speaker microphone device an Intelligent speaker?
As of March 2025, just having a microphone connected to Teams Rooms or a BYOD laptop (where the user has a Copilot or Teams Premium license assigned) makes a device an Intelligent Speaker. But this has not always been the case. In the before times, you needed a specific piece of hardware to use the speaker recognition feature.
Which now raises the question: Is a Microsoft certified Intelligent Speaker still needed? Is there any benefit to these certified devices over "non-certified Intelligent Speakers"?
Good question. But first, let's dive into a bit of what makes a certified Intelligent Speaker special.
There are some hints of what makes Microsoft certified Intelligent Speakers so fancy. But not much. It is mentioned that Intelligent Speakers include a 7-microphone array[7] to help identify the voices of up to ten people in a meeting room. Little more is given regarding hardware requirements. The Jabra PanaCast 50 (P50) has 8 beamforming microphones, so I guess that’s good enough!
Beyond the hardware, there are the Microsoft services on the backend that really provide the magic powers. Microsoft says that they are leveraging the powers of Microsoft Graph to “…provide[s] access to rich people-centric data and insight in the Microsoft Cloud to contextualize the transcription. For example, because we know who the speaker is, the acronyms, names of colleagues, and different words the speaker uses can be more accurately transcribed.”[8]
Cool.
Not mentioned is all the other magic that needs to happen. For example, it must be able to match up a given voice to you. Or me. There is a cloud-based audio-matching algorithm that must do this. And then a cloud-based Speech-to-text service which converts your spoken words to text so that it can be accurately written to the transcript.
And then there must be a way for us to manually fix mistakes (if we care enough).
As of October 2023[9], there are now six hardware devices that Microsoft has certified for Intelligent Speaker.
- EPOS Expand Capture 5
- Yealink M Speech[10]
- Sennheiser TeamConnect Intelligent Speaker
- Jabra Panacast 50
- Yealink SmartVision 60
- Lenovo ThinkSmart Bar 180 [11]
Back to the big question: Are the above devices any better? I don't know of any specific testing and results. However, Microsoft has repeatedly said that certified Intelligent Speakers will outperform "non-certified" microphones. In the official Microsoft documentation, it says:
While we're delighted to extend the capability of speaker recognition to more rooms, it's important to note the quality may not match that of an intelligent speaker certified device. So, it's essential to evaluate the advantages of incorporating an intelligent speaker, especially in crucial spaces where attaining the highest quality transcription and attribution is vital. 1
It was also mentioned in the announcement of speaker recognition no longer requiring certified hardware. This was written by Christian Schacht - Principal Program Manager at Microsoft who is responsible for the speaker recognition feature.
While we're delighted to extend the capability of speaker recognition to more rooms, it's important to note that the quality may not match that of an intelligent speaker device. Intelligent speakers are designed with multiple microphones to provide high-quality audio, maximizing accuracy in recognition and transcription and boasting an industry-leading reduction of word error rate. In rooms where top-quality transcription and attribution are imperative, it’s worth it to assess the benefits of integrating intelligent speaker hardware certified for Teams. 2
And then Christian Schacht mentioned it again in a YouTube video explaining this feature and how to set it up. Fast forwarding to the 2:30 portion of this video, Christian says
...so long story short, the certified hardware for intelligent speaker will always be a little bit better because we just get more information [..] out of the device directly. 3
It is ultimately up to you if you want to go the certified hardware route. Just note that for the most accurate transcript, Microsoft believes certified hardware is the best option.
Why is this even a thing?
Why does Intelligent Speaker even exist? Heck – have you ever been on a meeting with transcription enabled?
Until 2024 - I hadn't been. (Thanks Copilot! #SpoilerAlert)
So why? I’ll tell you why: Because it’s cool technology!
OK, that’s not why. The why is boring and I’m trying to pep up this section. And I think I’m failing. And now I’m just wasting your time. So here we go:
Regulated Persons.
There you go. Good times.
What’s a regulated person?
According to some random website called Law Insider, “Regulated Persons means certain broker-dealers and registered investment advisers that are subject to prohibitions against participating in pay-to-play practices and are subject to the SEC’s oversight and, in the case of broker-dealers, the oversight of a registered national securities association, such as FINRA.”[12]
Put another way, these people have all their communications logged, tracked, and recorded so, should a legal issue arise, they can claim their innocence. Hopefully. Otherwise: jail time.
So how do you track everything someone says when they walk into a common space like a conference room? Hello, Intelligent Speaker.
This has been the primary use case for Intelligent Speaker since its launch. And as such, this has been a niche feature that most Teams admins have either never heard of or have ignored because there was no need for it.
BUT THAT IS ALL CHANGING!
Let me introduce you to my little friend – Copilot! Copilot! Copilot!
What happens if you throw AI, erm, Copilot at a transcript? It can quickly summarize it, pull out notes, and even put together a list of tasks derived from the meeting. And a transcript from a meeting room with proper attribution for Copilot to ingest? That’s like the greatest thing ever.
Now Copilot can summarize tasks like “Michael agreed to buy the donuts” instead of “Conference Room A agreed to buy the donuts”[13].
The Intelligent Speaker feature now becomes far more than a niche feature for a handful of regulated persons. It becomes a potential game changer for office workers around the globe.
What are the requirements for Intelligent Speaker?
We now know that Intelligent Speaker will save the planet. Or something like that. How does one set it up? What are the requirements? There are quite a few and I’ll start by setting up the administrative side and then show you how to set up the end-user side.
Hardware requirements
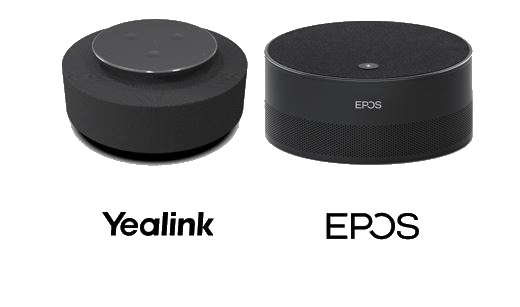
I’ve already mentioned the six supported Intelligent Speakers above. But here they are again with pictures. I’m doing this to drive home just how different the Jabra PanaCast 50 (and the Lenovo ThinkSmart Bar 180) is than the other certified Intelligent Speakers on the market.[14]
| EPOS Capture 5 | 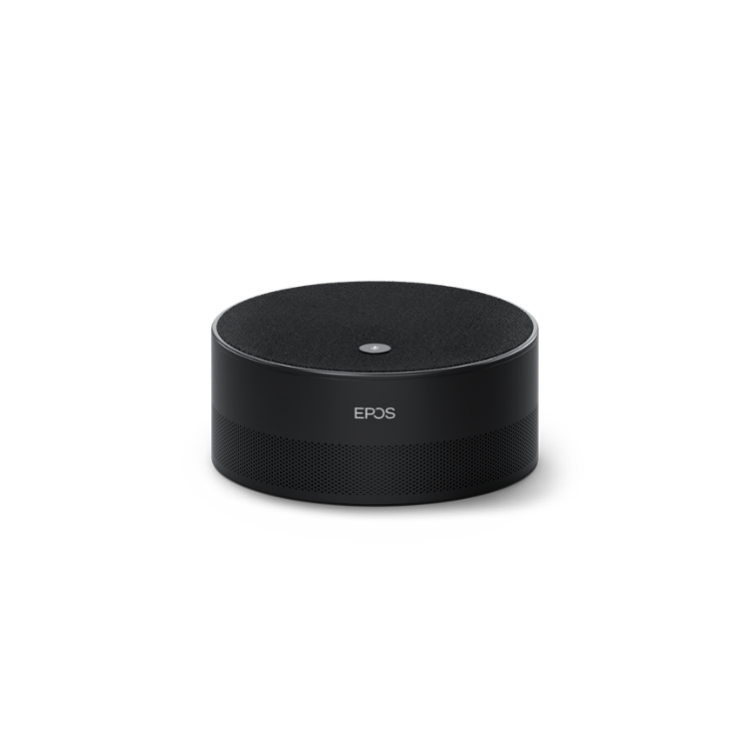 |
| Jabra PanaCast 50 | 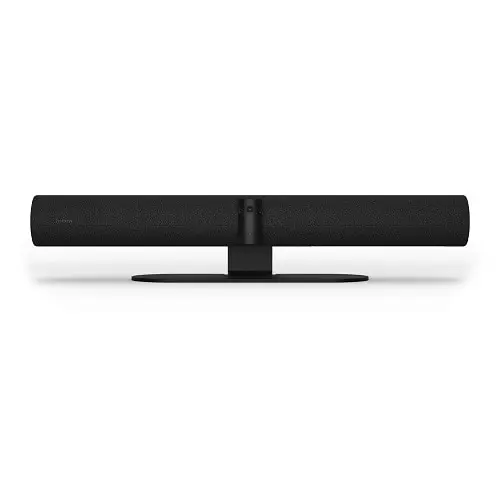 |
| Lenovo ThinkSmart Bar 180 |  |
| Sennheiser TeamConnect Intelligent Speaker | 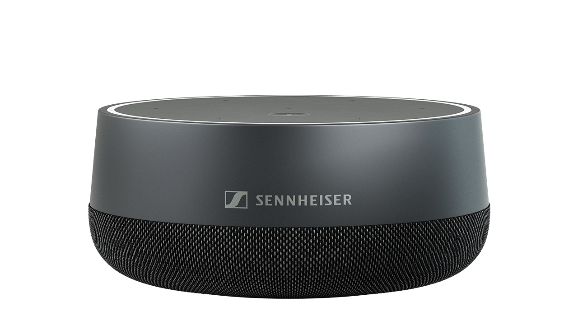 |
| Yealink MSpeech |  |
| Yealink MVC S60 (Maybe) | 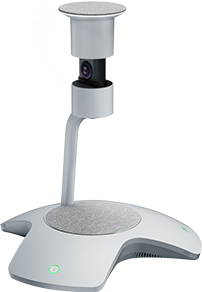 |
Two are an all-in-one video bar with industry leading video and audio. Three of them are speaker pucks and the other is a center-of-table device. Can you spot which one is the best option?[15]
Note that Intelligent Speaker now works without the need for a certified Intelligent Speaker. See the discussion above. TLDR: any microphone connected to Teams Rooms or a Copilot-licensed user laptop (PC or Mac) will work, but a certified Intelligent Speaker will work better.
And that’s about it for hardware.
Note: If someone is still using a Logitech SmartDock running Teams Rooms, sell them a more modern Teams Rooms implementation. Remind them that Intelligent Speaker is not supported on those ancient things due to “… a known issue that Teams Rooms can't recognize the Intelligent Speaker through the dock.” 4
Software Requirements
The software requirements for Intelligent speaker are straightforward. You will need a Microsoft Teams Rooms (Android or Windows) installation, connected to the Intelligent Speaker of your choosing Jabra PanaCast 50. You also need to set the PanaCast 50 as the default speaker and microphone within Teams Rooms. For Intelligent Speaker to work, it must be the default speaker and microphone.[17]
Network Requirements
The network requirements for Intelligent Speaker are the same as for any Teams Rooms installation, with the exception that when using speaker attribution, you need 7Mbs of available upload bandwidth. [18] On the nerd side, the seven microphones could send seven streams to Microsoft. That adds a maximum of 1Mbs per audio stream which would be a maximum of 7Mbs. Once the audio streams reach Microsoft, magic happens, and voice matching is tried in the cloud.[19]
If you are not using certified intelligent Speaker hardware, then there is no increase in upstream audio bandwidth as only a single stream is sent to Microsoft. It is the same stream of audio sent if you have never enabled this feature. As such, the required audio bandwidth for non-certified Intelligent Speaker microphones is 1Mbps.
Note that the audio required for a Microsoft Teams client joining a meeting with Intelligent Speaker enabled does not change. The same single stream of combined audio is sent to the Teams client if Intelligent Speaker is enabled in the meeting or not.
Licensing Requirements
The Teams Rooms resource account needs a Teams Rooms Pro license assigned to it. Speaker attribution is not supported on the Teams Rooms Basic license.[20]
Note: If you are still using the legacy Teams Rooms Standard or Teams Rooms Premium license, Intelligent Speaker features will work with both licenses.
For BYOD scenarios, the person connecting the intelligent speaker to their Teams client (aka the "Room Host") needs a Copilot or Teams Premium license. 5 The meeting organizer in a BYOD scenario does not need Copilot or Teams Premium, unless they are also the person connecting the intelligent speaker to their laptop (Room Host).
How about user licenses?
The meeting organizer needs at least an E1 or A1 license in order to create the meeting. Their ability to permit recording and transcription is based on the Teams AI policy assigned to them. This gets discussed later.
Attendees whose voice you want attributed in the transcript must be members of the same tenant as the meeting organizer. They also need to be able to sign in to Teams and record their biometric voiceprint. The ability to record a voiceprint is also controller by a Teams AI policy, discussed in the "Create/Edit Teams Policies" section below.
Note that you can't do much with a meeting transcript at this point, at least with regards to Microsoft tools. All you have now is a transcript with speaker attribution. If you want to do something useful with it (at least in this modern Microsoft world), you will need to assign your users Copilot and/or Teams Premium licenses.
Note: You can always feed the transcript into ChatGPT or other large language models and they'll do a really good job analyzing the transcript for you. You don't *have* to use Copilot, it's just easier and native within the Microsoft ecosystem.
For Teams Rooms: The meeting organizer does not need a Copilot or Teams Premium license for voice recognition/intelligent speaker to work. You can happily join a meeting hosted by someone in your tenant with an E1 license and - if you have a Copilot license - you can then fire off prompts to Copilot during or after the meeting. Your ability to query Copilot is in no way tied to the meeting organizer also having a Copilot license. All Copilot is doing is analyzing the transcript. The meeting organizer's role in your ability to use Copilot only goes so far as their rights to create meetings that allow for transcripts.
For BYOD scenarios, the "Room Host" needs to have a Teams Premium or Copilot license for Intelligent Speaker to work. The room host is the person who connects their laptop to the intelligent speaker (in-room microphone). 5
In the scenario above, the meeting organizer (who does not have a Copilot license) cannot use Copilot and will not get an intelligent meeting recap, but you will as you have a Copilot license. I made a table below to help explain this and other licensing add-on scenarios. The below is above and beyond the E1/A1 minimum license.
| Teams Rooms Scenarios | Organizer | Attendee |
| No Copilot licenses for anyone | Attributed transcript created if their meeting policy allows it. No Copilot prompting, no intelligent meeting recap, but attributed transcript created if their meeting policy allows it. Can download the transcript. | No Copilot prompting, no intelligent meeting recap. Can download the transcript. |
| Organizer has a Copilot license, attendees do not | Attributed transcript created if their meeting policy allows it. Organizer can prompt Copilot and receive the post-meeting intelligent meeting recap. Can also download the transcript. | No Copilot prompting, no intelligent meeting recap. Can download the transcript. |
| Organizer has a Teams Premium license, attendees do not. | Attributed transcript created if their meeting policy allows it. Organizer will receive the post-meeting intelligent meeting recap. Can also download the transcript. | No Copilot prompting, no intelligent meeting recap. Can download the transcript. |
| Organizer has no Copilot or Teams Premium license; Attendee has Copilot license. | Attributed transcript created if their meeting policy allows it. Can download the transcript but cannot use Copilot to do anything fun with it. | Attendee can prompt Copilot and receive the post meeting intelligent meeting recap. Can also download the transcript. |
| Organizer has no Teams Premium or Copilot License; Attendee has a Teams Premium license. | Attributed transcript created if their meeting policy allows it. Can download the transcript but cannot use Teams Premium to do anything fun with it. | Attendee will receive the post-meeting intelligent meeting recap. Can also download the transcript. |
| Everyone has a Copilot license | Attributed transcript created if their meeting policy allows it. Organizer can prompt Copilot and receive the post-meeting intelligent meeting recap. Can also download the transcript. | Attendee can prompt Copilot and receive the post-meeting intelligent meeting recap. Can also download the transcript. |
Note: This is assuming attendees have the right to view and download transcripts. Here is how to block downloads of Teams transcripts.
| Teams BYOD Scenarios | Organizer | Room Host | Attendee |
| No Copilot or Teams Premium licenses for anyone | No Copilot prompting, no intelligent meeting recap, but attributed transcript created if their meeting policy allows it. Can download the transcript. | N/A | No Copilot prompting, no intelligent meeting recap. Can download the transcript. |
| Organizer has a Copilot license, room host and attendees do not | Attributed transcript created if their meeting policy allows it. Organizer can prompt Copilot and receive the post-meeting intelligent meeting recap. Can also download the transcript. | N/A | No Copilot prompting, no intelligent meeting recap. Can download the transcript. |
| Organizer has a Teams Premium license, room host and attendees do not. | Organizer will receive the post-meeting intelligent meeting recap. Can also download the transcript. | N/A | No Copilot prompting, no intelligent meeting recap. Can download the transcript. |
| Organizer has no Copilot or Teams Premium license; Attendee has Copilot license. | Attributed transcript created if their meeting policy allows it. Can download the transcript but cannot use Copilot to do anything fun with it. | Attributed transcript & Intelligent meeting recap created if their meeting policy allows it and they are also an in-room attendee. Room host can prompt Copilot and receive the post meeting intelligent meeting recap if licensed correctly. Otherwise, no attributed transcript as they do not have a Copilot or Teams Premium license. Can download the transcript. | Attendee can prompt Copilot and receive the post meeting intelligent meeting recap. Can also download the transcript. |
| Organizer has no Teams Premium or Copilot License; Attendee has a Teams Premium license. | Attributed transcript created if their meeting policy allows it. Can download the transcript but cannot use Teams Premium to do anything fun with it. | Attributed transcript & Intelligent meeting recap created if their meeting policy allows it and they are also an in-room attendee. Otherwise, no attributed transcript as they do not have a Copilot or Teams Premium license. Can download the transcript. | Attendee will receive the post-meeting intelligent meeting recap. Can also download the transcript. |
| Everyone has a Copilot license | Attributed transcript created if their meeting policy allows it. Organizer can prompt Copilot and receive the post-meeting intelligent meeting recap. Can also download the transcript. | Attributed transcript created if their meeting policy allows it. Can prompt Copilot and receive the post-meeting intelligent meeting recap. Can also download the transcript. | Attendee can prompt Copilot and receive the post-meeting intelligent meeting recap. Can also download the transcript. |
Note: Downloading transcripts presumes that transcripts are enabled for the meeting. This does not apply to the option to use Copilot without transcripts.
Other stuff
This feature is available in all countries and regions, at least as Microsoft defines them. That does not mean that all languages and locales are supported. See this list for a list of supported locales[21].
Beyond being available in certain locales, there are legal ramifications to using Intelligent Speaker. For Intelligent Speaker to work, users will have to give up some biometric information (i.e., their voice print). Some nations, principalities, city-states, workers councils, and other political boundaries may have an issue with this. Check first if this is legal to be used where you intend to set it up.
Second, if it is legal to be used, verify with your organization's legal team if it is legal (or desired at all) in your organization. Some companies like plausible deniability. Not having a transcript sure helps avoid some of that pesky legal paperwork that needs to be handed over in a lawsuit. Or they just really value their employee’s privacy.
Assuming the points above are cleared, the Microsoft Teams administrator then needs to create policies that enable the voice attribution feature. Starting in Mid-February 2025, this feature is enabled by default for all users via the global Teams AI policy. Admins can be more tactical by disabling the Global Teams AI policies, creating custom policies, and only assigning the policy to users willing to give up their voice print for the common good.
The ability for users to record and capture their voice and face within Teams is now defaulted to On for every user. This was announced in Message Center post MC892646.
Which leads to….you must hope your users record their voice prints. It is completely voluntary for them to do this. It’s generally bad form to force an employee to give over personal biometric data like their voice[22].
How do I set up Intelligent Speaker?
This can get a little tricky but if it were easy, I wouldn’t be writing this.
For only Teams Rooms on Windows, continue below. For Teams Rooms Android and BYOD, you can safely skip down to Create/Edit Teams Meeting Policies.
Configure the hardware
The first thing is to make sure your Intelligent Speaker is on the latest firmware. As I work for Jabra, I'll walk through how to configure our PanaCast 50. If you are using a different vendors certified Intelligent Speaker, follow their instructions for properly configuring the hardware.
Make sure your Jabra PanaCast 50/Lenovo ThinkSmart Bar 180 is on firmware version 6.22 or later. You also need to have Jabra Direct[23] version 6.11.28601 or later.
Connect your PanaCast 50 to a computer and start Jabra Direct. Once the PanaCast 50 is recognized by Jabra Direct, click on it to get to the settings.

On the screen that appears, click on Settings to get to the good bits.

From within Device settings, scroll down until you see the Playback device type setting. Hit the drop down and change it from “Communication device” to “Microsoft Teams Rooms device”.

Click Save at the top and then reboot. The PanaCast 50 is now ready to be an Intelligent Speaker.
Configure Teams Rooms on Windows
After your Jabra PanaCast 50 reboots, you’re not quite done. You now need to verify that the setting was successfully applied and that it is set as the correct output device within Teams Rooms on Windows.
Go to the Teams Rooms on Windows console and tap More.

On the next screen tap Settings.

You are then prompted to sign into Teams Rooms with administrative credentials. Enter the administrative password to move on to the next step.
From within Settings, scroll down to the Peripherals section.

Finally, set the Audio settings for Teams Rooms. For Microphone for Conferencing, select the PanaCast 50 that has UAC2_TEAMS in the name, as shown in the image below. (For a ThinkSmart Bar 180, the name will be different, but (UAC2_TEAMS) will be the same).

Set the Speaker for Conferencing to the PanaCast 50 that has UAC2_Render in the name. This is shown in the below image. (For a ThinkSmart Bar 180, the name will be different, but (UAC2_Render) will be the same).

Set the default speaker to the same thing you set above – the (UAC2_Render) device.
At this point you’ve completed the easy part from the admin side. Now you need to create some policies.
Create/Edit Teams Policies
Up until now, this has been straightforward and anyone with a laptop, a cable, and (optionally) a PanaCast 50 handy can do this work. At this point, things change. In most organizations, you now need to bring in your Microsoft 365 administrators as you need to edit or create new policies to apply some custom settings.
Microsoft has a PowerShell cmdlet called CsTeamsAIPolicy. This cmdlet provides granular control over voice and face recognition and sets the stage for future AI-related settings.
Within CSTeamsAIPolicy, the Global policy is set with the parameter EnrollVoice (and EnrollFace) set to Enabled.
The person creating or editing these policies needs any of the following roles assigned to them:
The Global Teams AI policy only enables voice (and face) enrollment of your end users. You still need to create a new policy for the Microsoft Teams Rooms Resource Account and a policy that is applied to your users allowing them to enable transcription.[26]
The first policy I will create is to enable the speaker attribute feature. For Teams Rooms, note that you don’t set policies on the Teams Rooms device, you set policies on the Resource Account that signs into Teams Rooms and runs the meetings on the device.
First, I will create a policy called IntelligentSpeakerMTR that sets the value “roomAttributeUserOverride” to “Attribute”.[27]
There are three values you can set for “roomAttributeUserOverride”.
One is “False” which turns the feature off. Another is “Attribute” which enables speaker attribution. The third is “Distinguish” which tells the speaker to distinguish between different voices but to *not* provide name attributes for the transcript (e.g., “Speaker 1”, “Speaker 2” instead of “Alice”, “Bob”)
Create Policies
-
Teams Rooms
-
BYOD
Creating Teams Rooms Policy
These are the steps for setting up Intelligent Speaker on Teams Rooms. For BYOD, click the other tab.
Let me show you how to create these policies using Microsoft Teams PowerShell. You cannot do this using Teams admin center, which is the tool for total n00bs. YOU are not a total n00b are you? You are a 1337 h4x0r! We 1337 h4x0r5 use PowerShell!
If you are indeed 1337 h4x0r, do your thing. You don’t need documentation!
For those aspiring 1337 h4x0r5, I’ll walk you through this.
First, start PowerShell on your PC as Administrator (Pro Tip: use the Terminal app). If you don’t know how to start PowerShell, you can stop now and pass this documentation off to a more experienced administrator.
Once PowerShell has started, you need to make sure you have the Microsoft Teams PowerShell module installed. If you are unsure, run the following cmdlets[31] with these parameters:
Install-Module -Name PowerShellGet -Force -AllowClobber
Install-Module -Name MicrosoftTeams -Force –AllowClobber
Import-Module –Name MicrosoftTeams

And just for fun, let's make sure your Microsoft Teams PowerShell module is updated. The CsTeamsAIPolicy is new and for you to use it, you'll need to have an updated version of Teams PowerShell installed.
Fortunately, this is easy, just run Update-Module MicrosoftTeams.

Now that you have the correct PowerShell module installed, you need to connect to Microsoft Teams via PowerShell. You do this by running
Set-ExecutionPolicy -ExecutionPolicy Unrestricted
Import-Module –Name MicrosoftTeams
Connect-MicrosoftTeams from your terminal window. After entering this cmdlet, you will be prompted to sign in.

When successfully signed in, you get this wonderful feedback (your values will be different).

Now we can get to business.
The cmdlet needed to create a new Teams meeting policy is New-CsTeamsMeetingPolicy. This is the full command line I will enter:
New-CsTeamsMeetingPolicy -Identity IntelligentSpeakerMTR -roomAttributeUserOverride Attribute
Copy and paste that into your PowerShell session. After a few seconds you should get a raft of information back. If you aren’t into playing a PowerShell version of “Where’s Waldo”, you can run this PowerShell command to see what the value is set to for “roomAttributeUserOverride”.
Get-CsTeamsMeetingPolicy -Identity IntelligentSpeakerMTR | Select "roomAttributeUserOverride"

If the value returned is “Attribute” then you are ready for the next step.
Creating BYOD Policy
These are the steps for setting up Intelligent Speaker for BYOD use cases. For Teams Rooms, click the other tab.
You need to allow the ability of your end-users to create attributed transcripts. By default, this is disabled. As such, we need to create a new policy to allow this. (If you already have a custom meeting policy for your users, feel free to edit that instead.)
First, start PowerShell on your PC as Administrator (Pro Tip: use the Terminal app). If you don’t know how to start PowerShell, you can stop now and pass this documentation off to a more experienced administrator.
Once PowerShell has started, you need to make sure you have the Microsoft Teams PowerShell module installed. If you are unsure, run the following cmdlets[31] with these parameters:
Install-Module -Name PowerShellGet -Force -AllowClobber
Install-Module -Name MicrosoftTeams -Force –AllowClobber
Import-Module –Name MicrosoftTeams
And just for fun, let's make sure your Microsoft Teams PowerShell module is updated. The CsTeamsAIPolicy is new and for you to use it, you'll need to have an updated version of Teams PowerShell installed.
Fortunately, this is easy, just run Update-Module MicrosoftTeams.
Now that you have the correct PowerShell module installed, you need to connect to Microsoft Teams via PowerShell. You do this by running
Set-ExecutionPolicy -ExecutionPolicy Unrestricted
Import-Module –Name MicrosoftTeams
Connect-MicrosoftTeams from your terminal window. After entering this cmdlet, you will be prompted to sign in.
When successfully signed in, you get this wonderful feedback (your values will be different).
Now we can get to business.
The cmdlet needed to create a new Teams meeting policy is New-CsTeamsMeetingPolicy. This is the full command line I will enter:
New-CsTeamsMeetingPolicy -Identity IntelligentSpeakerUser -roomAttributeUserOverride Attribute -AllowTranscription $true
Copy and paste that into your PowerShell session. After a few seconds you should get a raft of information back. If you aren’t into playing a PowerShell version of “Where’s Waldo”, you can run this PowerShell command to see what the value is set to for “roomAttributeUserOverride”.
Get-CsTeamsMeetingPolicy -Identity IntelligentSpeakerUser | Select "roomAttributeUserOverride","AllowTranscription"
If the value returned is “Attribute” then you are ready for the next step.
You will now create a second policy that you will assign to your users. The policy we just made allows your users to turn on transcripts with the attribution feature. The next policy allows your users to record their voice.
-
Teams Rooms
-
BYOD
Creating Teams Rooms Policy
These are the steps for setting up Intelligent Speaker on Teams Rooms. For BYOD, click the other tab.
Let me show you how to create these policies using Microsoft Teams PowerShell. You cannot do this using Teams admin center, which is the tool for total n00bs. YOU are not a total n00b are you? You are a 1337 h4x0r! We 1337 h4x0r5 use PowerShell!
If you are indeed 1337 h4x0r, do your thing. You don’t need documentation!
For those aspiring 1337 h4x0r5, I’ll walk you through this.
First, start PowerShell on your PC as Administrator (Pro Tip: use the Terminal app). If you don’t know how to start PowerShell, you can stop now and pass this documentation off to a more experienced administrator.
Once PowerShell has started, you need to make sure you have the Microsoft Teams PowerShell module installed. If you are unsure, run the following cmdlets[31] with these parameters:
Install-Module -Name PowerShellGet -Force -AllowClobber
Install-Module -Name MicrosoftTeams -Force –AllowClobber
Import-Module –Name MicrosoftTeams

And just for fun, let's make sure your Microsoft Teams PowerShell module is updated. The CsTeamsAIPolicy is new and for you to use it, you'll need to have an updated version of Teams PowerShell installed.
Fortunately, this is easy, just run Update-Module MicrosoftTeams.

Now that you have the correct PowerShell module installed, you need to connect to Microsoft Teams via PowerShell. You do this by running
Set-ExecutionPolicy -ExecutionPolicy Unrestricted
Import-Module –Name MicrosoftTeams
Connect-MicrosoftTeams from your terminal window. After entering this cmdlet, you will be prompted to sign in.

When successfully signed in, you get this wonderful feedback (your values will be different).

Now we can get to business.
The cmdlet needed to create a new Teams meeting policy is New-CsTeamsMeetingPolicy. This is the full command line I will enter:
New-CsTeamsMeetingPolicy -Identity IntelligentSpeakerMTR -roomAttributeUserOverride Attribute
Copy and paste that into your PowerShell session. After a few seconds you should get a raft of information back. If you aren’t into playing a PowerShell version of “Where’s Waldo”, you can run this PowerShell command to see what the value is set to for “roomAttributeUserOverride”.
Get-CsTeamsMeetingPolicy -Identity IntelligentSpeakerMTR | Select "roomAttributeUserOverride"

If the value returned is “Attribute” then you are ready for the next step.
Creating BYOD Policy
These are the steps for setting up Intelligent Speaker for BYOD use cases. For Teams Rooms, click the other tab.
You need to allow the ability of your end-users to create attributed transcripts. By default, this is disabled. As such, we need to create a new policy to allow this. (If you already have a custom meeting policy for your users, feel free to edit that instead.)
First, start PowerShell on your PC as Administrator (Pro Tip: use the Terminal app). If you don’t know how to start PowerShell, you can stop now and pass this documentation off to a more experienced administrator.
Once PowerShell has started, you need to make sure you have the Microsoft Teams PowerShell module installed. If you are unsure, run the following cmdlets[31] with these parameters:
Install-Module -Name PowerShellGet -Force -AllowClobber
Install-Module -Name MicrosoftTeams -Force –AllowClobber
Import-Module –Name MicrosoftTeams
And just for fun, let's make sure your Microsoft Teams PowerShell module is updated. The CsTeamsAIPolicy is new and for you to use it, you'll need to have an updated version of Teams PowerShell installed.
Fortunately, this is easy, just run Update-Module MicrosoftTeams.
Now that you have the correct PowerShell module installed, you need to connect to Microsoft Teams via PowerShell. You do this by running
Set-ExecutionPolicy -ExecutionPolicy Unrestricted
Import-Module –Name MicrosoftTeams
Connect-MicrosoftTeams from your terminal window. After entering this cmdlet, you will be prompted to sign in.
When successfully signed in, you get this wonderful feedback (your values will be different).
Now we can get to business.
The cmdlet needed to create a new Teams meeting policy is New-CsTeamsMeetingPolicy. This is the full command line I will enter:
New-CsTeamsMeetingPolicy -Identity IntelligentSpeakerUser -roomAttributeUserOverride Attribute -AllowTranscription $true
Copy and paste that into your PowerShell session. After a few seconds you should get a raft of information back. If you aren’t into playing a PowerShell version of “Where’s Waldo”, you can run this PowerShell command to see what the value is set to for “roomAttributeUserOverride”.
Get-CsTeamsMeetingPolicy -Identity IntelligentSpeakerUser | Select "roomAttributeUserOverride","AllowTranscription"
If the value returned is “Attribute” then you are ready for the next step.
You will now create a second policy that you will assign to your users. The policy we just made allows your users to turn on transcripts with the attribution feature. The next policy allows your users to record their voice.
Creating the End User Policy
To enable or disable a users' ability to register their voice (and face), you will work with the CsTeamsAIPolicy.
Note - Be sure to routinely update your Teams PowerShell modules.
Update-Module -Name MicrosoftTeams
If you run Get-CsTeamsAIPolicy, it should return a single, global policy where both voice and face recognition are enabled.

If that is what you want in your organization - Great! You are done. Scroll down to the next section (Assigning Teams Rooms Policy).
To allow flexibility in your environment, create two additional policies: one that enables only voice enrollment (disabling face enrollment), and another that enables only face enrollment (disabling voice enrollment).
To do this, run the following two cmdlets:
New-CsTeamsAIPolicy -Identity VoiceOnly -EnrollFace Disabled -EnrollVoice Enabled

New-CsTeamsAIPolicy -Identity FaceOnly -EnrollFace Enabled -EnrollVoice Disabled

New-CsTeamsAIPolicy -Identity EnableAll -EnrollFace Enabled -EnrollVoice Enabled
 If you're wondering why that last one is created when it is a duplicate of the Global policy, keep reading. 🙂
Within policies in Teams, there is the concept of a policy hierarchy. When there are conflicting policies for a user, the policy *closest* to the user is applied.
In the above, there is a global policy that enables both voice and face enrollment. But we just created a policy enabling only one or the other. Which policy takes precedence? The easiest way to think of this is that since you will specifically apply one of the two policies we created to a user, those take precedence over the Gobal policy. For the third one to make sense, change the Global policy values from enabled to Disabled.
Set-CsTeamsAIPolicy -Identity Global -EnrollFace Disabled -EnrollVoice Disabled
I'm personally opposed to ever editing the Global policies. The upside to editing global policies is it's easy. Change it there, and everyone gets the policy. The downside is you lose some flexibility. It's up to you and your IT policies in how to handle editing global policies.
If you choose to leave the global policy untouched, you need to create one more policy to disable both voice and face enrollment.
New-CsTeamsAIPolicy -Identity DisableAll -EnrollFace Disabled -EnrollVoice Disabled
![]() Now assign that policy to all your users. Then for the users who are authorized to enroll their voice or face, assign one of the three policies above.
Now assign that policy to all your users. Then for the users who are authorized to enroll their voice or face, assign one of the three policies above.
To remove a policy, use the Remove-CsTeamsAIPolicy. The following cmdlet removes the EnableAll policy.
Remove-CsTeamsAIPolicy -Identity EnableAll
Assigning the meeting policy for n00bs
Now that you have the meeting policy created, you need to assign it to either a Teams Rooms Resource account (If using Teams Rooms) or directly to end users (if using BYOD). Or do both if you have a mix of Teams Rooms and BYOD rooms. The perceived easiest way for a new administrator to do this is via Microsoft Teams admin center (TAC). This way you can click away with no mucking about with PowerShell.
To access TAC, open a web browser and enter admin.teams.microsoft.com into the address bar. If necessary, sign into your Microsoft 365 tenant.
From here navigate to the Users section and click on Manage Users

From here, you can either scroll down and find an account, or type in the account name in the Search for a user search box. In this case, I will edit the second account listed – “Conference Room – MTR1”. I click on the name in the Display name column to bring up the properties for that account.
Once I have the properties for that account, I click on Policies to see which policies are assigned to that account.

To change a policy, click on the Edit icon. This brings up the list of possible policies and their settings. Scroll down until you see Select Meeting policy.

After clicking on the drop-down list for meeting policies, you see all available options. Select IntelligentSpeakerMTR and click Apply at the bottom of the screen.

You have now assigned this policy to the Teams Rooms Resource Account.
For end users (aka BYOD), you do this the exact same way, except you may have to change the assigned policy name (IntelligentSpeakerUsers).
Note: After a policy is assigned, it can take up to 48 hours to take effect. To get the policy to take effect sooner, accounts must be signed out and signed back in.
Assigning Teams Rooms Policy for 1337 h4x0r
Grant-CsTeamsMeetingPolicy -Identity mtr.mtressler.1@jabrademos.com -PolicyName IntelligentSpeakerMTR
Assigning BYOD Policy for n00bs
I'll show how you can assign the Teams Meeting policy via the Teams admin center GUI.
The steps for assigning the Teams meeting policy are the exact same as above – go to Teams admin center, find an end user, and change their policy to IntelligentSpeakerUsers. Click apply and wait for the change to take effect.
The one difference is you probably want to apply this to several users at once and not assign the policy one at a time. To do this, click to the left of the names to which you want to assign this policy. A checkmark appears next to the selected names.

Once you have the names selected, scroll back to the top and click Edit settings.

From here, scroll down to Meeting policy and select IntelligentSpeakerUsers, then click Apply at the bottom to apply the policy to the group of users.

Assigning BYOD Policy for 1337 h4x04. And for n00bs.
Grant-CsTeamsMeetingPolicy -Identity avance@jabrademos.com -PolicyName IntelligentSpeakerUsers
Assigning TeamsAIPolicy.
If you created a custom Teams AI policy, you will need to open a Microsoft Teams PowerShell session and run the following command. Change PolicyName to whatever is appropriate. In the below example, I set the policy for avance@jabrademos.com to "VoiceOnly"
Grant-CsTeamsAIPolicy -Identity avance@jabrademos.com -PolicyName VoiceOnly
If you want to apply this policy to many people, you can do the following. However, if you are a PowerShell n00b, ask for help. Things can go very wrong if you type in the wrong PowerShell commands.
The below will assign the policy named VoiceOnly to absolutely every one of your users. Be careful with this. If you are not experienced with PowerShell and how to bulk-assign policies, phone a friend first to ask for guidance.
Get-CsOnlineUser | Grant-CsTeamsAIPolicy -PolicyName VoiceOnly
Digital voice profile
At this point, all the work is done from the administrative side. Now it is up to end users to record their voice profiles. You (legally, at least in most countries) can’t force people to do this. Sadly. 😊 However, once people see the benefit of this, they may volunteer to create a voice profile, but I would be surprised if you ever get 100% end user buy-in. Some people are too lazy to do it, and some people value their biometric privacy.
Biometric Privacy with Intelligent Speaker
What is the privacy story? Where is the recorded voice stored? Can anyone access it? Does it work cross-tenant? Those are all good questions and maybe I’ll answer two or three of those.
First, your voiceprint is stored in the same region as your other data. If your tenant is scoped to only store data in a specific region, your voiceprint stays in that specific region. The voiceprint is encrypted at rest.6 "Voice data is stored in the Office 365 trusted compliance store".7
“Voice data will be securely stored in the Office 365 Cloud, and users will retain control of their information, including the ability to delete it at any time. The capture of voice data can be turned on or off for each meeting. Additionally, admins have full control to turn on/off people identification through voice recognition feature across the organization.”[33]
End users can export their audio data[34] via the Teams client. If a user has made a voice recording, you will see an option to download the biometric profile. [35]

Audio data can only be used within your tenant. This means if you or someone in your tenant hosts the meeting, then Intelligent Speaker features will work (if enabled). If you walk into a meeting room at another Office 365 tenant, your voice profile data will not be used and you will show up as “Speaker X” in the transcription.
To clarify, Alice from Contoso has set up her voice profile. She is going to an in-person meeting with Bob at Northwind Traders. Both Bob and Northwind Traders have successfully set up Intelligent Speaker. In the meeting with Bob and Alice in the Northwind Traders conference room, Bob will be properly attributed in the meeting room, while Alice will appear as “Speaker 1” – even though she has set up her biometric data. This is because the biometric data from Contoso is not shared with Northwind Traders.
Another point: the voice print biometric data is only used within Teams voice-recognition scenarios and not by any other Microsoft software or service. [36]
In a pro-privacy move, user voice print data is removed if the user “…isn't invited to any meetings with an Intelligent Speaker within that 1-year period.”[37] If a user leaves the company and their account is deleted, the data is removed within 30 days, or whatever data retention policy is in effect.[38]
Set up your digital voice profile
To set up your voice profile, open the Teams app, click the three dots (…) in the upper right, and click on Settings.

Once settings opens, scroll down to Recognition. If you see the message that says you are not enabled, then :sad face:. Most likely, you have not been assigned the Intelligent Speaker policy defined above, or the policy has not yet taken effect on your account. Come back later.

If the policy has been assigned and applied to the user, you get the following screen instead.

Click on Create voice profile to get started.

At the top of the screen (where it says “Microphone array…”) you can select which microphone you are using for the recording. Make sure you pick the right microphone and that you are in a quiet room. Click Start voice capture and read that paragraph. It doesn’t matter if you mess up and need to read part of it again. You are not recording something for posterity. You are just letting Teams learn what your unique voice print is.
Nerd Note: You can read *anything* you want. That paragraph on the screen is just something that’s long enough to get a decent voice print. So as mentioned above – it doesn’t matter if you mess up. The point is that you speak for 15 seconds or so.
Note: You can not create or update your voice print while you are in a meeting. If you try to do this, you will receive this awkwardly worded notice:

How to use Intelligent Speaker in a Meeting
Now that you have your voice print made, you just roll into a conference room, start talking, and magic happens, right?
Oh, if it were so easy. You precious child. With your simplistic desires.
There is more than just setting up policies and recording your voice. You need to set up the meeting invite correctly.
Note: Speaker recognition will work in an ad-hoc/unscheduled meeting, but speaker attribution will not. Put another way, even with your voice enrolled, you will show up in the transcript as Speaker 1 or Speaker 2, not as your real name.
Here are the requirements that must be met to meet with an Intelligent Speaker to have attributed transcription work successfully:
- Everyone who intends to have their voice transcribed must be listed on the meeting invite.
- No more than 20 people who have registered their voice[42] can be on the meeting invite. (Well, 19 if you include yourself, the organizer)
- Transcription needs to be supported for the meeting. (We did that in the meeting policy, but it’s the meeting organizers policy – not yours – that determines if transcription is allowed)
- Someone needs to turn on transcription in their Teams client. Once the meeting starts, you can only enable transcription from the Teams client and not directly on the Teams Rooms console.
- To enable transcription, click the three dots (More) from within the meeting. Then click Record and transcribe > and finally click Start transcription

At this point, you should see a transcription with your name instead of something generic as seen at the very beginning of this white paper (Figure 1: Donuts are delicious).
Below is a stolen image that was very likely a copyright violation until I probably did the greatest Photoshop edit ever to totally make it a unique work. Like Andy Warhol, this is my art.
If you look at the transcription on the right, you’ll see that it says Serena Ribeiro (Conf Room P…). This lets us know that Intelligent Speaker is working as it recognized Serena’s voice and that she is in a conference room.

Note: This feature is currently removed and will be added again later. (Note added 6 August 2024)
What if someone in the conference room speaks and they don’t have a voice print (either they never set it up, weren’t on the invite, or are from a different tenant). What happens then? Anything?
Intelligent Speaker tracks all the voices in the room (well the first 10). If it recognizes a unique voice, it will tag it as Speaker 1 in the transcript. If a second new user speaks with no accessible voice print, they will be Speaker 2, etc.
See the following stolen screen shot for an example of a person being tagged as Speaker 1.

Editing mistakes
What if this whole thing makes a mistake? Or we just want to manually attribute a user in the transcript.
In the image above, you see there is a button named Identify speaker. If you click that, a drop down appears showing the names of everyone that was on the meeting invite your name. Click on you name and that attribution is fixed.
Note: You can only change to yourself a person that was on the meeting invite. This is to prevent falsely attributing something to someone else. Otherwise, nothing would stop me from attributing something to Luke Skywalker that Darth Vader said.
For more information on editing attribution on a transcript, see this document. I’m not in the mood to basically copy/paste that article into this one.
Note: You can hide your identity in meeting captions and transcripts! See this link for more info.
Troubleshooting
I’m not going to write a guide because:
- Review the steps above and make sure you got it right.
- Bugs pop up and Microsoft has a page dedicated to known issues. So please go there. (Though at the time of this writing they are still referencing an old Teams Rooms license so…..)
- One tip: If you see "Speaker 1" in the meeting transcript instead of the person's name, this is a sign that this has been set up correctly, but it is not recognizing the person speaking. Make sure the user policies have been assigned to the user - which could take a minute. Or two days. Also, have the user re-record their voice in the Teams client. I have seen this fix a problem with a person not being recognized.
Summary
I hope this document helped you understand what Intelligent Speaker is and how to set it up with a Jabra PanaCast 50. It’s a cool feature but there is one warning:
Don’t expect perfection.
I’ve historically been disappointed in the accuracy of the attributed names in the transcription. However, due to the Jabra PanaCast 50 going through Microsoft’s Technology Adoption Program (TAP), Microsoft themselves looked closely at this feature for the first time in a while. As such, the service has gotten quite a few improvements on the back end.
Oh hey – I never answered why this solution is called Intelligent Speaker. This whole feature is based around microphones that capture voices so shouldn’t it be called Intelligent Microphone? Yes, yes it should. Also, the name Intelligent Speaker presumes that the person talking is saying something intelligent. That is not always the case.
It’s called Intelligent Speaker just because. It’s what Microsoft initially called it in development - most likely because it was initially based on a speaker puck design so that name kind of stuck.
- Microsoft Teams Rooms and Devices: Microsoft Ignite 2023 - Microsoft Community Hub ↑
- Microsoft Teams Rooms and Devices: Microsoft Ignite 2023 - Microsoft Community Hub ↑
- Flexible work is here to stay: Microsoft 365 solutions for the hybrid work world | Microsoft 365 Blog ↑
- The Yealink MSpeech can only connect to a Yealink Microsoft Teams Rooms. The EPOS can connect to any vendors Teams Rooms. ↑
- Flexible work is here to stay: Microsoft 365 solutions for the hybrid work world | Microsoft 365 Blog ↑
- I will always bring the donuts. ↑
- Announcing general availability for Intelligent speakers for Microsoft Teams Rooms - Microsoft Community Hub ↑
- Announcing general availability for Intelligent speakers for Microsoft Teams Rooms - Microsoft Community Hub ↑
- The Yealink MVC S60 should be certified soon. ↑
- Yealink MSpeech can only be used with Yealink Teams Rooms installations ↑
- The Lenovo ThinkSmart Bar 180 is manufactured by Jabra. As such, this document completely applies to the Lenovo ThinkSmart Bar 180 as well
- Regulated Persons Definition | Law Insider ↑
- Just to clear up any future confusion: I will always buy the donuts. ↑
- Plus, it makes this whitepaper longer which adds to its legitimacy. ↑
- It’s the second one. The Jabra one. That’s the best one! If you picked that one, go get yourself a well-deserved donut. ↑
- As mentioned in the preamble, this will change at some point in 2024 where you can also use a BYOD connected laptop or desktop. ↑
- I don’t have a reference for this. But I worked at Microsoft. You gonna question me on this one??? ↑
- Tenant Administration control for voice recognition (voice profile) in Teams Rooms - Microsoft Teams | Microsoft Learn ↑
- Source: Conversation between Greg Baribault, Microsoft, and the author at Teams Rooms World, 25 October, 2023. ↑
- Microsoft Teams Rooms licenses - Microsoft Teams | Microsoft Learn ↑
- What is a locale? Locale - Globalization | Microsoft Learn ↑
- Wait until we get into facial recognition! Speaking of which - Intelligent Speaker is *not* a technical requirement for facial recognition to work. Microsoft want to recognize people in the room when they are not an active speaker. As of today, the Teams client requires voice before facial biometrics can be recorded but I get the impression that will change in time. Source: Conversation between Greg Baribault, Microsoft, and the author at Teams Rooms World, 25 October, 2023 ↑
- You can download Jabra Direct from here - Jabra Direct - Engineered to optimize and personalize your headset ↑
- Use Microsoft Teams administrator roles to manage Teams - Microsoft Teams | Microsoft Learn ↑
- Use Microsoft Teams administrator roles to manage Teams - Microsoft Teams | Microsoft Learn ↑
- Create resource accounts for rooms and shared Teams devices - Microsoft Teams | Microsoft Learn ↑
- Set-CsTeamsMeetingPolicy (SkypeForBusiness) | Microsoft Learn ↑
- Tenant Administration control for voice recognition (voice profile) in Teams Rooms - Microsoft Teams | Microsoft Learn ↑
- Tenant Administration control for voice recognition (voice profile) in Teams Rooms - Microsoft Teams | Microsoft Learn ↑
- Tenant Administration control for voice recognition (voice profile) in Teams Rooms - Microsoft Teams | Microsoft Learn ↑
- What is a “cmdlet”? Cmdlet Overview - PowerShell | Microsoft Learn ↑
- Tenant Administration control for voice recognition (voice profile) in Teams Rooms - Microsoft Teams | Microsoft Learn ↑
- Announcing general availability for Intelligent speakers for Microsoft Teams Rooms - Microsoft Community Hub ↑
- Tenant Administration control for voice recognition (voice profile) in Teams Rooms - Microsoft Teams | Microsoft Learn ↑
- I have no idea why this is possible, as biometric data should be secured and you should only be allowed to delete it. But that's just my opinion. ↑
- Tenant Administration control for voice recognition (voice profile) in Teams Rooms - Microsoft Teams | Microsoft Learn ↑
- Tenant Administration control for voice recognition (voice profile) in Teams Rooms - Microsoft Teams | Microsoft Learn ↑
- Data retention, deletion, and destruction in Microsoft 365 - Microsoft Service Assurance | Microsoft Learn ↑
- Use Microsoft Teams Intelligent Speakers to identify in-room participants in a meeting transcription - Microsoft Support ↑
- Use Microsoft Teams Intelligent Speakers to identify in-room participants in a meeting transcription - Microsoft Support ↑
- Use Microsoft Teams Intelligent Speakers to identify in-room participants in a meeting transcription - Microsoft Support ↑
- Clarified by Ilya Bukshteyen, 18 April 2024, in a chat message of the Teams Firesdai Chat meeting. Microsoft Support ↑
- Tenant Administration control for voice recognition (voice profile) in Teams Rooms - Microsoft Teams | Microsoft Learn
- Tenant Administration control for voice recognition (voice profile) in Teams Rooms - Microsoft Teams | Microsoft Learn[↩]
- Get the most out of any Teams Rooms meeting with speaker recognition and Copilot - Microsoft Community Hub[↩]
- https://youtu.be/r4OxLKQ8pC4?si=UM8x0y9uYGbJtMQi&t=150[↩]
- This may no longer be relevant now that any microphone can do speaker recognition[↩]
- Tenant Administration control for voice recognition (voice profile) in Teams Rooms - Microsoft Teams | Microsoft Learn[↩][↩]
- Overview of voice and face enrollment - Microsoft Teams | Microsoft Learn[↩]
- https://learn.microsoft.com/microsoftteams/rooms/voice-and-face-recognition#frequently-asked-questions[↩]
6 comments
Skip to comment form
A great article Michael, thanks for taking the time to publish it!
One question for you in the networking section. You’ve mentioned the requirement is 7Mbs, 1Mbs per mic. Does that mean it’s 8Mbs for the P50, or are you using the 8 mics in an array to form 7 virtual mic streams to send back to Microsoft?
Author
It is 7Mbps total. As I understand it, Intelligent Speaker supports up to 7 simultaneous audio streams. So I guess our 8th microphone is unused/echo cancellation, etc. Or muted. I should ask engineering what we do with the 8th one.
Nice job – trying to set this up for my home office.
Awesome write-up, thanks so much!
Why could you not just enable to Global?
PS C:\WINDOWS\system32> Get-CsTeamsMeetingPolicy -Identity Global | Select “roomAttributeUserOverride”,”AllowTranscription”
RoomAttributeUserOverride AllowTranscription
————————- ——————
Attribute True
Author
You absolutely could. In a prior life, we never touched global defaults. I carry that mindset forward and there is nothing wrong with editing the global setting. Just be sure you are aware of policy precedence. But absolutely, you can change the global policy.